Bridge Pattern: Decouple Abstraction from Implementation for Scalable Systems
Master the Bridge design pattern in Java with step-by-step implementation, scalable architecture examples, and practical solutions for subclass explosion.

The Challenge of Rigid Hierarchies
Ever tried to extend a class hierarchy only to find yourself tangled in a web of subclasses? Imagine building a cross platform drawing application. You start with a Shape class and quickly add Circle and Rectangle subclasses. But then you need to support multiple graphics rendering systems: say, OpenGL (used on Windows, Mac, and Linux) and DirectX (Microsoft's Windows specific graphics API). Each system has its own way of drawing shapes to the screen, requiring different implementation code. Suddenly, you're duplicating subclasses for every combination: OpenGLCircle, DirectXCircle, OpenGLRectangle, DirectXRectangle and the hierarchy explodes. Every new shape means creating separate versions for each rendering system, and every new graphics API means duplicating all your existing shapes.
This is a classic case of the Combinatorial Explosion problem. The Bridge pattern solves this by decoupling abstraction from implementation, letting you mix and match independently without subclass bloat.
Understanding the Bridge Pattern
The Bridge pattern separates an abstraction from its implementation so the two can evolve independently. It introduces two parallel hierarchies: one for abstractions (what you want to do) and one for implementations (how you do it). The abstraction contains a reference to the implementation, and delegates work to it.
Think of it like a media player interface (abstraction) and audio formats (implementation). You can have different players: mobile app, desktop app, web player: that all work with different formats like MP3, FLAC, or streaming protocols, without creating separate classes for every player format combination.
This pattern promotes Flexibility, Scalability, and adherence to the Open Closed Principle: you can add new abstractions or implementations without modifying existing code.
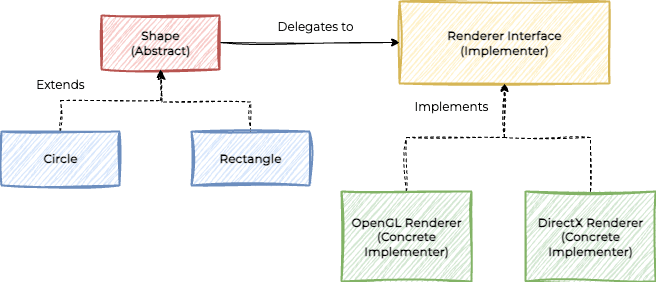
Bridge pattern components
Core Components
Abstraction: Defines the high level interface and maintains a reference to the implementor.
Implementor: Interface for implementation classes.
Concrete Implementor: Implements the implementor interface.
Refined Abstraction: Extends the abstraction to add specialized behavior.
Complete Java Implementation
Let's build a drawing system that supports multiple shapes and rendering APIs, demonstrating the Bridge pattern's power:
The Abstraction (Shape)
public abstract class Shape {
    protected Renderer renderer;

    public Shape(Renderer renderer) {
        this.renderer = renderer;
    }

    public abstract void draw();

    public void setRenderer(Renderer renderer) {
        this.renderer = renderer;
    }
}
The Implementor (Renderer)
public interface Renderer {
    void renderCircle(double x, double y, double radius);
    void renderRectangle(double x, double y, double width, double height);
}
Concrete Implementors
public class OpenGLRenderer implements Renderer {
    @Override
    public void renderCircle(double x, double y, double radius) {
        System.out.println("OpenGL: Drawing circle at (" + x + ", " + y + ") with radius " + radius);
    }

    @Override
    public void renderRectangle(double x, double y, double width, double height) {
        System.out.println("OpenGL: Drawing rectangle at (" + x + ", " + y + ") with width " + width + " and height " + height);
    }
}

public class DirectXRenderer implements Renderer {
    @Override
    public void renderCircle(double x, double y, double radius) {
        System.out.println("DirectX: Drawing circle at (" + x + ", " + y + ") with radius " + radius);
    }

    @Override
    public void renderRectangle(double x, double y, double width, double height) {
        System.out.println("DirectX: Drawing rectangle at (" + x + ", " + y + ") with width " + width + " and height " + height);
    }
}
Refined Abstractions
public class Circle extends Shape {
    private double x, y, radius;

    public Circle(Renderer renderer, double x, double y, double radius) {
        super(renderer);
        this.x = x;
        this.y = y;
        this.radius = radius;
    }

    @Override
    public void draw() {
        renderer.renderCircle(x, y, radius);
    }

    public void setRadius(double radius) {
        this.radius = radius;
    }
}

public class Rectangle extends Shape {
    private double x, y, width, height;

    public Rectangle(Renderer renderer, double x, double y, double width, double height) {
        super(renderer);
        this.x = x;
        this.y = y;
        this.width = width;
        this.height = height;
    }

    @Override
    public void draw() {
        renderer.renderRectangle(x, y, width, height);
    }

    public void resize(double width, double height) {
        this.width = width;
        this.height = height;
    }
}
Client
public class DrawingApp {
    public static void main(String[] args) {
        // Create different renderers
        Renderer opengl = new OpenGLRenderer();
        Renderer directx = new DirectXRenderer();

        // Create shapes with different renderers
        Shape circle = new Circle(opengl, 10, 20, 5);
        Shape rectangle = new Rectangle(directx, 0, 0, 15, 10);

        // Draw with initial renderers
        System.out.println("=== Initial Rendering ===");
        circle.draw();      // OpenGL: Drawing circle at (10, 20) with radius 5
        rectangle.draw();   // DirectX: Drawing rectangle at (0, 0) with width 15 and height 10

        // Switch renderers dynamically
        System.out.println("\n=== Switching Renderers ===");
        circle.setRenderer(directx);
        rectangle.setRenderer(opengl);

        circle.draw();      // DirectX: Drawing circle at (10, 20) with radius 5
        rectangle.draw();   // OpenGL: Drawing rectangle at (0, 0) with width 15 and height 10
    }
}
Expected Output:
=== Initial Rendering ===
OpenGL: Drawing circle at (10.0, 20.0) with radius 5.0
DirectX: Drawing rectangle at (0.0, 0.0) with width 15.0 and height 10.0

=== Switching Renderers ===
DirectX: Drawing circle at (10.0, 20.0) with radius 5.0
OpenGL: Drawing rectangle at (0.0, 0.0) with width 15.0 and height 10.0
🚀 Get the Complete Implementation
The full code with additional shapes and renderers is available in our Design Patterns Repository.
# Clone and run the complete demo
git clone https://github.com/shift-elevate/design-patterns.git
cd design-patterns
mvn test -Dtest=BridgePatternTest
Extending the Bridge: Add New Shapes or Renderers
The Bridge pattern shines when you need to support new features without modifying existing code. The repository demonstrates how adding new shapes or renderers is straightforward:
Add a new shape by extending Shape and implementing draw()
Add a new renderer by implementing Renderer
Mix and match: Any shape can use any renderer
No subclass explosion: You avoid creating a new class for every combination
This demonstrates loose coupling and high cohesion: your abstractions and implementations evolve independently.
Try it yourself: Fork the repository and add new shapes (e.g., Ellipse, Polygon) or renderers (e.g., CanvasRenderer, WebGLRenderer)!
Real World Examples
1. GUI Toolkits
Many GUI frameworks use the Bridge pattern to separate widget abstraction from platform specific rendering:
// Abstract widget
public abstract class Button {
    protected WidgetRenderer renderer;

    public Button(WidgetRenderer renderer) {
        this.renderer = renderer;
    }

    public abstract void draw();
    public abstract void handleClick();
}

// Platform specific renderer
public interface WidgetRenderer {
    void renderButton(String label, int x, int y, int width, int height);
    void renderTextField(String text, int x, int y, int width, int height);
    void renderCheckbox(String label, boolean checked, int x, int y);
}

// Concrete implementations for Windows, Mac, Linux, etc.
public class WindowsRenderer implements WidgetRenderer {
    @Override
    public void renderButton(String label, int x, int y, int width, int height) {
        System.out.println("Windows: Creating button '" + label + "' at (" + x + "," + y + ")");
    }

    // Other methods...
}

public class MacRenderer implements WidgetRenderer {
    @Override
    public void renderButton(String label, int x, int y, int width, int height) {
        System.out.println("Mac: Creating button '" + label + "' at (" + x + "," + y + ")");
    }

    // Other methods...
}
2. Database Drivers
JDBC separates the database API (abstraction) from the driver implementation:
// Abstraction: Connection interface
Connection connection = DriverManager.getConnection(url, user, password);
// The abstraction (Connection) delegates to the driver (implementation)

// Different drivers implement the same interface
Connection mysqlConnection = DriverManager.getConnection(
    "jdbc:mysql://localhost/mydb", username, password);
Connection postgresConnection = DriverManager.getConnection(
    "jdbc:postgresql://localhost/mydb", username, password);
3. Cross-Platform Game Engines
Game engines often use the Bridge pattern to support multiple graphics APIs:
// Abstraction: GameObject
public abstract class GameObject {
    protected GraphicsAPI graphicsAPI;

    public GameObject(GraphicsAPI graphicsAPI) {
        this.graphicsAPI = graphicsAPI;
    }

    public abstract void render();
    public abstract void update();
}

// Implementor: GraphicsAPI
public interface GraphicsAPI {
    void drawSprite(String texture, double x, double y);
    void drawText(String text, double x, double y, String font);
    void setColor(int r, int g, int b, int a);
}

// Concrete Implementors: OpenGL, DirectX, Vulkan
public class OpenGLAPI implements GraphicsAPI {
    @Override
    public void drawSprite(String texture, double x, double y) {
        System.out.println("OpenGL: Drawing sprite '" + texture + "' at (" + x + "," + y + ")");
    }

    // Other methods...
}
When to Use Bridge Pattern
✅ Ideal Scenarios:
You need to support multiple abstractions and implementations independently.
Avoiding subclass explosion from combinatorial inheritance.
Building cross platform libraries or frameworks.
Decoupling high level logic from platform specific details.
Enabling independent evolution of features and platforms.
Creating flexible systems that can switch implementations at runtime.
❌ Skip It When:
There's only one abstraction or implementation.
The abstraction and implementation are tightly coupled by nature.
Performance is critical and the delegation overhead is unacceptable.
Next Steps: Apply Bridge Pattern in Your Project
Identify Parallel Hierarchies: Look for places where you have multiple dimensions of change.
Define Clean Interfaces: Separate what you want to do from how it's done.
Implement the Bridge: Create abstraction and implementor hierarchies.
Test Combinations: Ensure all pairs work as expected.
Plan for Growth: Add new abstractions or implementations as your system evolves.
Monitor Performance: Measure the impact of delegation overhead in your specific use case.
The Bridge pattern transforms rigid, tangled hierarchies into flexible, scalable architectures. By decoupling abstraction from implementation, you empower your codebase to grow without fear of subclass explosion.